59,00 $
- a standalone Vouchersystem for WordPress
- send your voucher as PDF via e-mail
- style your voucher in the backend
- Requires WordPress Version: 4.9 or higher
- Compatible up to: 6.0
- Requires PHP Version: 5.2.4 or higher
Description
KVoucher is a WordPress plug-in for small or medium-sized companies such as restaurants or other retail companies that operate a WordPress website and want to give customers the opportunity to buy digital vouchers online via the website. The voucher and the invoice will then be sent directly by e-mail. The voucher is paid for via PayPal Plus.
A PayPal account and a PayPal client ID are required.
Furthermore, the owner of the plugin has the option in the backend of the WordPress page to determine whether the voucher should be sent by PDF or by post or whether the customer should choose whether to send it.
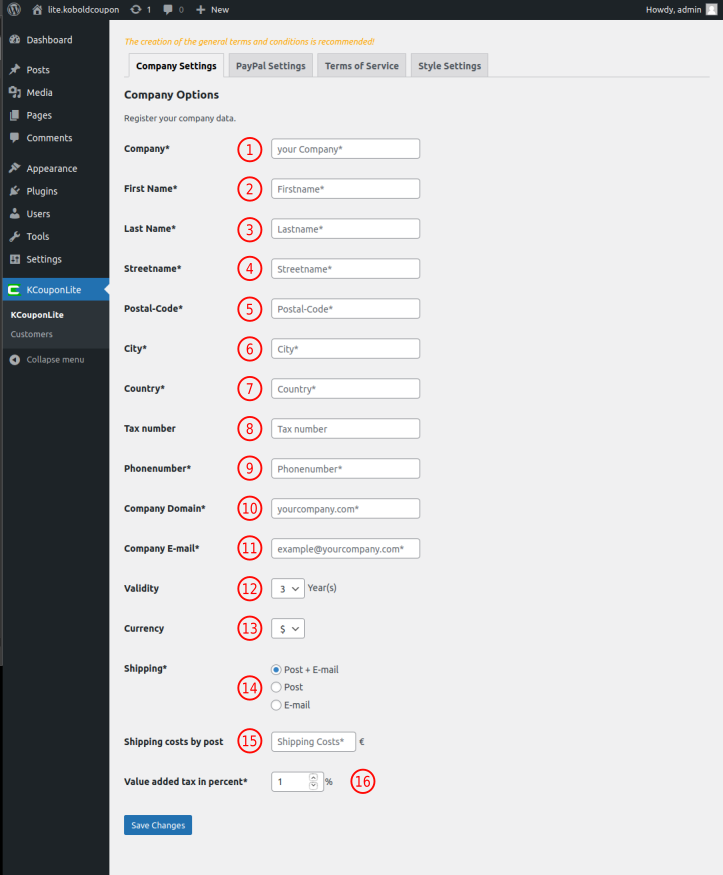
In addition to the required company contact data, the following settings are possible:
Company settings
- Setting the tax number (optional)
- Validity (duration) in years
- Currency (euro, pound, dollar)
- Shipping (post + e-mail, post, e-mail)
- Shipping
- Value added tax
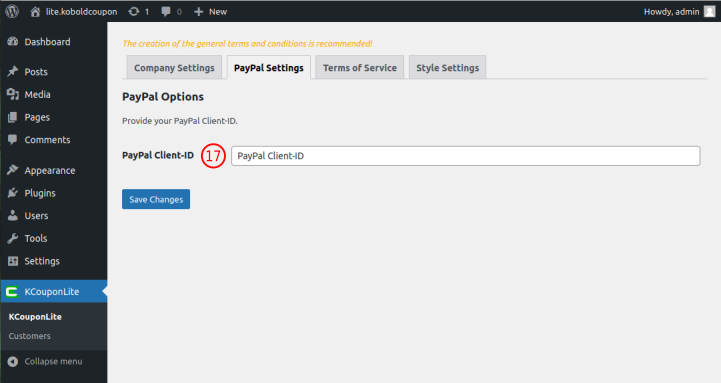
PayPal settings
- PayPal client ID (required)
Terms of Use
- Terms of use (optional)
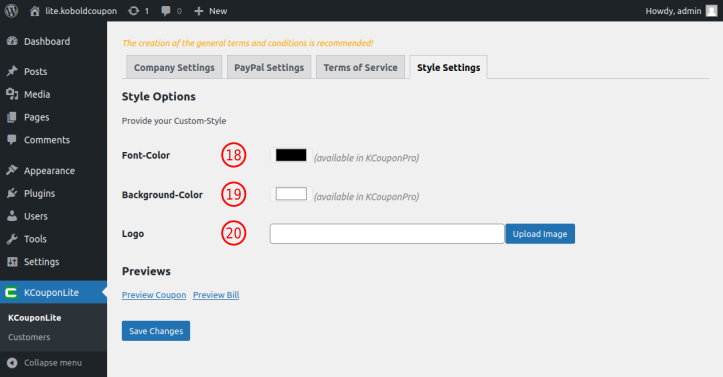
Style settings
- Setting the company logo
Installation:
- Log into your WordPress site: e.g .: www.yourwebsite.com/wp-admin/
- Select the menu item “Plugins” in the left column, then click “Install”.
- Instead of using the search field, click on the “Upload plugin” button at the top.
- A window then opens. Here you can manually upload the KCoupon.zip file, which you downloaded previously, from your computer to WordPress. To do this, you have to click “Select file”.
- Navigate to the directory with the plug-in (ZIP format) that you want to install, mark it and click on “Open” (here the selection window on a Mac).
- Now click on “Install”.
- Now click on “Activate this plugin” to be able to use the new extension.
- Finally insert the shortcode “[kvoucher]” on the WordPress page, where the order process for ordering a voucher should appear.
Configuration:
Company Settings

1. Enter the name of your company here (required)
2. Enter your first name here (required)
3. Enter your last name here (required)
4. Enter the street of the registered office of your company (required)
5. Enter the postcode of the headquarters of your company here (required)
6. Enter the city of the registered office of your company (required)
7. Enter the country of the registered office of your company (required)
8. Enter the tax number of your company here (optional)
9. Enter the telephone number of your company here (required)
10. Enter the domain of your company here e.g .: yourdomain.com (required)
11. Enter the email address of your company here.
12. Enter the period of validity of your voucher here.
13. Select your currency here.
14. Select the shipping options here.
15. Enter the shipping costs when sending by post.
16. Specify the sales tax in percent here.
PayPal Settings

17. Enter your PayPal client ID here. You can create a PayPal client ID at www.paypal.com if you have a PayPal account.(required)
Style Settings

18. Here you can set the font color of the PDF voucher.
19. Here you can insert the logo of your company into the PDF voucher.
Customers

20. (Screen Options) Select here which columns should be visible to you and how many customers should be displayed.
21. (all | open | redeemed | canceled) here you can select which vouchers should be displayed.
22. Here you can view and download the documents sent by e-mail.
23. Here you can delete the voucher or go to the voucher detail page.
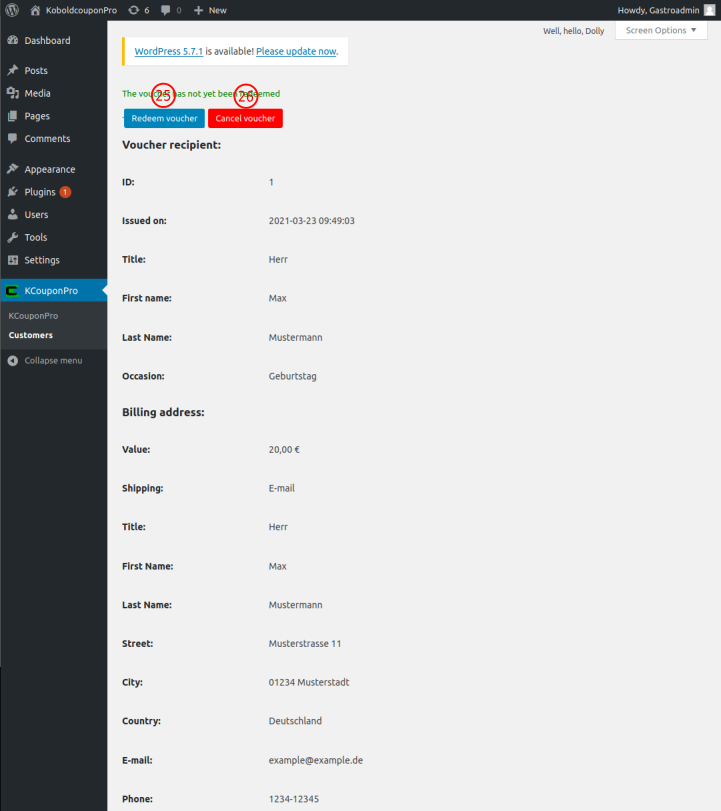
Customer details

24. (Redeem voucher) The voucher is redeemed here and noted in the database. Once redeemed, the voucher is no longer valid.
25. (cancel voucher) vouchers can be canceled here.
Redeem the voucher
- 1st possibility To redeem the voucher, all you have to do is scan the QR code on the PDF voucher. The WordPress backend opens and you only have to click on “Redeem voucher” to mark the voucher as “redeemed”.
- 2nd possibility Log into your WordPress backend, navigate to “Customers” (KVocherPro → Customers), enter the voucher ID in the search field, open the voucher and click on “Redeem voucher” to convert the voucher as “ redeemed ”.
